A well-installed roof protects your home, boosts curb appeal, and ensures long-term value. In Arlington, VA, and the surrounding areas, asphalt shingles remain one of the most popular roofing choices thanks to their affordability, versatility, and proven durability. Whether you’re building a new home or replacing an aging roof, understanding the asphalt shingle installation process helps you make informed decisions and ensure your investment pays off for decades.
At Painter Roofing, we’ve helped countless homeowners navigate roof installations with confidence. This comprehensive guide walks you through every step of asphalt shingle installation, from preparation to final inspection, highlighting best practices that guarantee a strong, beautiful, and long-lasting roof.
Asphalt shingles remain the most popular roofing choice for homeowners in Burke VA due to their durability and affordability. Our professional roofers specialize in expert installing asphalt shingles that protects your home for decades.
Why Asphalt Shingles Are the Top Roofing Choice in Arlington
Before diving into the installation process, it’s important to understand why asphalt shingles are a leading choice for homeowners in Northern Virginia. They’re cost-effective compared to metal, tile, or slate roofs while still providing strong protection against weather elements. Asphalt shingles come in a wide range of colors, styles, and textures, allowing you to match your roof to your home’s architecture. Modern shingles are designed to resist high winds, algae growth, and UV damage. With proper installation, they typically last 20 to 30 years or more. This balance of affordability, durability, and design flexibility makes asphalt shingles the go-to material for many Arlington homeowners considering a roof replacement.
Roof Inspection and Preparation
Every successful asphalt shingle installation begins with a thorough roof inspection. At Painter Roofing, we examine the existing roof structure for signs of rot, leaks, or sagging that need repair before new shingles are installed. We assess the decking (the wooden base under the shingles) to ensure it’s strong and stable. Preparing the roof also includes removing old shingles, nails, and underlayment, leaving a clean surface for the new roofing system. Proper preparation is crucial to avoid problems like uneven shingles, leaks, or premature roof failure. This first step ensures your home’s structure is ready to support a long-lasting asphalt roof.
Installing Drip Edge and Underlayment
The foundation of a quality asphalt shingle installation includes protective layers beneath the shingles. A drip edge, a metal strip along roof edges, is installed first to guide water into the gutters and prevent damage to fascia boards. Next comes the underlayment—a water-resistant barrier that shields the decking from moisture infiltration. In Arlington’s climate, where heavy rain and snow are common, a high-quality underlayment adds extra protection against leaks and ice dams. We carefully secure this layer, ensuring complete coverage and smooth surfaces for the shingles to lay flat on top.
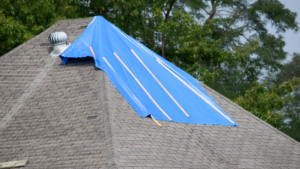
Ice and Water Shield Application
For added protection, especially in vulnerable areas like valleys and around chimneys, we install an ice and water shield. This self-adhesive membrane provides an extra waterproof barrier, preventing leaks caused by melting snow or wind-driven rain. While not every contractor includes this step, at Painter Roofing, we consider it an essential part of our asphalt shingle installation process for long-term reliability.
Starter Strip Installation
Starter strips are the first row of shingles placed along the eaves of your roof. They’re designed to create a secure, wind-resistant foundation for the first course of shingles. Using starter strips helps prevent blow-offs and ensures proper alignment for the rest of the roof. Skipping this step can lead to exposed seams and reduced wind protection, which is why our team includes it in every project.
Laying the Asphalt Shingles
This is the stage where your roof begins to take shape. We carefully install each shingle row, overlapping them precisely to create a watertight barrier. Proper nailing is critical—too few nails or incorrect placement can lead to shingle lifting or leaks. We follow manufacturer guidelines for nail placement and use high-quality fasteners designed to withstand Arlington’s weather conditions. Special attention is given to valleys, hips, and ridges where water runoff is highest, ensuring every detail of the installing asphalt shingles is secure and durable.
Installing Flashing and Roof Vents
Flashing is essential to prevent leaks around chimneys, skylights, vents, and other roof penetrations. We install or replace metal flashing to direct water away from these vulnerable areas. Proper ventilation is equally important to regulate attic temperature, reduce moisture buildup, and extend the life of your roof. Ridge vents, soffit vents, or box vents are installed as needed, ensuring your roofing system performs efficiently year-round.
Ridge Cap Shingle Installation
The ridge caps are the finishing touch on your new roof. These specially designed shingles cover the roof’s peak, adding both protection and aesthetic appeal. Properly installed ridge caps help prevent wind uplift and water intrusion at the highest point of your roof, completing the installing asphalt shingles with a polished, professional look.
Final Cleanup and Inspection
At Painter Roofing, we believe a job isn’t complete until your property is spotless and the roof is thoroughly inspected. We remove all debris, nails, and leftover materials from your yard and driveway. A final inspection ensures every shingle, nail, and seal is perfectly placed. We also walk you through the finished roof, explaining the materials used, warranty details, and maintenance tips to maximize your investment.
Common Mistakes to Avoid During Installing Asphalt Shingles
Not all roofing contractors follow best practices, leading to premature roof failure. Some common mistakes include poor surface preparation, skipping underlayment or starter strips, incorrect nailing techniques, and inadequate flashing installation. These shortcuts can cause leaks, shingle blow-offs, and voided warranties. Choosing an experienced contractor like Painter Roofing ensures your installing asphalt shingles meets the highest standards, protecting your home for years to come.
Factors That Influence the Cost of Asphalt Shingle Installation
The price of a new asphalt roof depends on several factors. These include the size and slope of your roof, the type and quality of shingles selected, additional protective layers like ice and water shields, and any necessary structural repairs. While some homeowners focus on finding the lowest price, investing in professional installation with high-quality materials provides better long-term value by preventing costly issues later. At Painter Roofing, we offer transparent, detailed estimates tailored to your home’s unique needs.
How Long Does Installing Asphalt Shingles Take?
The timeline for installing a new roof varies based on project size, weather, and preparation requirements. Most residential asphalt shingle installations in Arlington take one to three days to complete. Larger or more complex roofs may take longer, especially if decking repairs or additional waterproofing layers are needed. We prioritize both speed and quality, ensuring your new roof is installed efficiently without cutting corners.
Why Professional Installation Beats DIY Roofing
While some homeowners consider DIY roofing to save money, improper installation can lead to serious problems. Roofing is dangerous, requires specialized tools, and demands precise techniques for proper sealing, alignment, and ventilation. Mistakes during DIY asphalt shingle installation often result in leaks, poor performance, and voided warranties. Hiring experienced professionals like Painter Roofing guarantees a safe, durable, and warranty-protected roof.
Maintaining Your Asphalt Shingle Roof After Installation
A new roof is a big investment that deserves ongoing care. Routine inspections, especially after storms, help catch small issues before they turn into expensive repairs. Keep gutters clean to prevent water backup and damage to shingles. Trim overhanging branches to reduce debris buildup and potential impact damage. With regular maintenance and prompt repairs, your new asphalt roofing installation can last decades while maintaining your home’s beauty and value.
Why Arlington Homeowners Choose Painter Roofing
Local experience, craftsmanship, and a reputation for honesty make Painter Roofing the trusted choice for roof installations in Arlington and nearby areas. We understand the specific weather challenges Northern Virginia homeowners face, from heavy rains to winter ice dams and summer heat. Our team uses top-quality materials, follows strict industry standards, and treats every project with care and precision. When you choose us for your asphalt roofing installation, you get more than a new roof—you get peace of mind knowing your home is protected by skilled professionals dedicated to excellence.
Final Thoughts: A Strong Roof Starts with Expert Installation
Asphalt shingles are a reliable, attractive, and cost-effective choice for protecting your home, but only when installed correctly. A detailed, professional process ensures your roof performs as expected, withstands Arlington’s weather conditions, and enhances your home’s curb appeal.
At Painter Roofing, we take pride in delivering flawless asphalt roofing installation backed by solid warranties and exceptional customer service. If you’re planning a roof replacement or new installation, contact us today for a consultation and see why Arlington homeowners trust us to get the job done right.
FAQs
How should asphalt shingles be installed?
Asphalt shingles should be installed starting from the bottom of the roof and working upward in overlapping rows. Each row must be aligned to ensure proper coverage and prevent water leakage. It’s important to secure each shingle with roofing nails and apply a layer of tar paper to protect against moisture. For best results, install shingles on a dry, calm day to ensure proper adhesion.
How often should asphalt shingles be replaced?
Asphalt shingles typically need to be replaced every 20 to 30 years, depending on factors like climate, roof maintenance, and the quality of the shingles. If shingles show signs of cracking, curling, or missing granules, it may be time for replacement. Regular inspections can help extend the lifespan of your roof.
What are disadvantages to asphalt shingles?
Asphalt shingles have a shorter lifespan compared to other materials like metal or tile, typically lasting 20 to 30 years. They can be prone to cracking, curling, and granule loss, especially in areas with severe weather, leading to potential leaks.
How long does it take to install asphalt shingles?
The installation of asphalt shingles typically takes 1 to 3 days, depending on the size and complexity of the roof. Factors such as weather conditions, the number of workers, and roof pitch can affect the timeline.